Quick Asset Manager
Quickly Create, Edit, Organize, or Delete your local asset files.
Blender’s Asset Library is powerful, but managing your own assets is unnecessarily tedious. Saving assets takes too many steps, and once they’re saved, Blender offers no easy way to rename, edit metadata, reorganize catalogs, or delete assets without manually opening files.
Quick Asset Manager fixes that.
It lets you save assets directly to your configured libraries with full metadata support, then manage those assets in place. Rename them, edit metadata and tags, move them between catalogs or libraries, swap them into scenes, or delete them entirely. No file hunting. No opening .blend files just to make a small change.
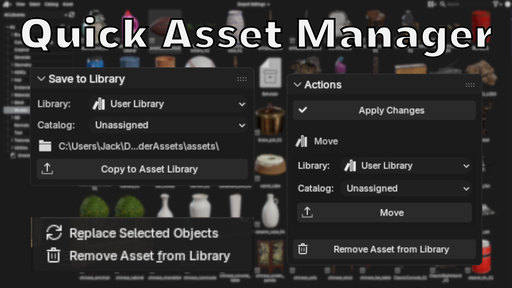
Features- Direct Save: Save selected assets to any configured Blender library with one click, including optional catalog assignment.
- Editable Saved Assets: Edit any metadata fields or tags you desire in your saved assets
- Move & Organize: Move assets between catalogs or entire libraries without touching the filesystem
- Swap Assets: Replace selected scene objects by right-clicking any object or collection asset.
- Bulk Operations: Move multiple assets at once, or bundle them into a single .blend file for easy sharing.
- Open the Asset Browser and switch to Current File view
- Select an asset you want to save
- Open your tool panel (N by default)
- Configure the asset name, catalog, and metadata as needed
- Choose your target library and optional catalog from the dropdowns
- Click Save to Asset Library
- Open the Asset Browser and select any already saved asset
- Open your tool panel (N by default)
- Change any metadata field as needed
- Choose Apply Changes
- Open the Asset Browser and select any already saved asset
- Open your tool panel (N by default)
- At the bottom of the panel choose a new library and/or catalog destination
- Choose Move
- Ensure an item is selected in your scene
- Open the Asset Browser and find any already saved asset
- Right Click your desired asset and choose "Swap with active objects"
(Note: Only works for collection and object assets)
- Open the Asset Browser and switch to a configured library
- Select the assets you want to save
- Continue from the Quick Asset Bundler panel in the sidebar to the left
- Choose your target save directory
- Configure the bundle name, catalog copy, and overwrite settings
- Click Bundle and wait for your bundle to complete!
The addon will:
- Create a bundled.blend file with all your selected
- Automatically pack all required images and dependencies
- Apply all metadata and catalog assignments
- Save to your chosen directory with proper file naming
- Optionally save a copy of your catalog (categories) file
If this tool saves you time, consider supporting development. It helps fund updates and the replacement of my dead GPU 😅.
- Direct Save: Save assets to any configured Blender library with one click
- Full Metadata: Set name, description, author, license, copyright, tags, and catalog
- Smart Defaults: Configure default metadata in preferences to speed up your workflow
- Catalog Support: Automatically reads and assigns assets to library catalogs
- Conflict Handling: Choose to increment, overwrite, or cancel when files already exist
- Auto-Refresh: Optionally refresh the asset browser after saving
- Cross-Platform: Uses Blender's native path handling for Windows, Mac, and Linux
- Install the addon in Blender (Edit > Preferences > Add-ons)
- Configure your default library and metadata in addon preferences
- Ensure you have at least one asset library configured in Blender (Preferences > File Paths > Asset Libraries)
- Open the Asset Browser and switch to Current File view
- Select an asset you want to save
- Continue from the the Quick Asset Saver panel in the sidebar to the left
- Choose your target library from the dropdown
- Configure the asset name, catalog, and metadata as needed
- Click Save to Asset Library
The addon will:
- Create a standalone lightweight .blend file with your asset
- Automatically pack all required images and dependencies
- Apply all metadata and catalog assignments
- Save to your chosen library with proper file naming
Set default values that will auto-populate when selecting assets:
- Default Asset Library: Your preferred library for saving
- Default Author: Your name or organization
- Default Description: Standard description text
- Default License: License for your assets
- Default Copyright: Copyright notice
- Auto-Refresh: Toggle automatic asset browser refresh
- File access
- At least one configured asset library
If you’d like to support my Blender development (or help me replace my fried GPU 😅), you can donate here: https://buymeacoffee.com/clonephaze
- New Panel Layout — All panels now live in blenders native tool menu! (N-panel in the asset browser)
- Full companion file support — textures, thumbnails, metadata, HDRIs, docs, and asset-named folders move and delete together.
- Improved delete behavior — removes all related files, cleans up empty folders, and sends everything to the system Trash.
- Move assets between libraries and catalogs with full data preservation.
- Edit metadata for existing library assets.
- Replace scene objects with library assets.
- Bundle multiple assets into shareable .blend files.
- Correct catalog assignment when moving assets with companions.
- Handles multi-asset .blend files intelligently.
- Automatic cleanup of empty folders after move/delete.
- Safer, clearer feedback with detailed counts and logging.