wk_PowerPin
PowerPin helps animators lock feet cleanly during walk cycles.
It detects ground contact along a chosen local axis, bakes a non-destructive Combine overlay with 'Extrapolation: Nothing', and pins contact phases frame by frame.
wk_PowerPin
When animating characters with WalkCycles and let the characters walk around curves, it's very likely the feet slide more or less during turning.
wk_PowerPin automates the process of pinning down feet when they reach local Z=0 (or whatever axis you define as "up").
Even if you let your character walk up a hill, as long as you move the character's global controller, the feet will still have a local zero position during feet-down.
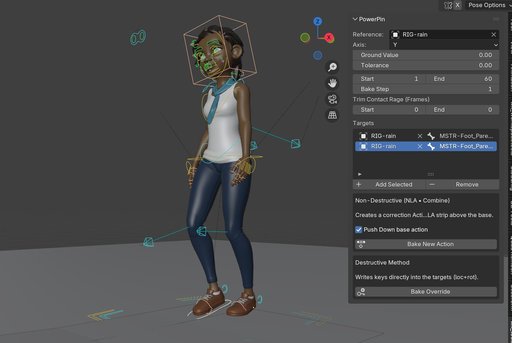


Just pick the character's armature as reference and the feet as targets. set start and end frame, back step and hit "Bake".
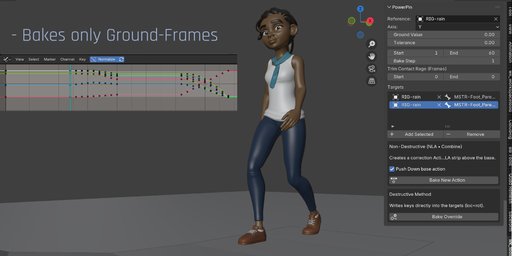
In Non-Destructive mode, PowerPin will key all pinning-animation in a NLA strip and adds it in the NLA editor. It's so easy to do changes in your walk animation: Just delete the new NLA strip, edit your animation, bake the feet again.
How it Works
You pick a Reference (usually the armature or a control object that defines the local up axis) and one or more Target feet/bones. wk_PowerPin finds ground-contact segments (local axis near the Ground Value within Tolerance), creates a Combine overlay action, and pins the foot across each segment. Outside contact frames, nothing is keyed.
Key Features
Automatically pins feet in global position during ground contact (e.g. z=0)
Set tolerance, in case your walk cycle animation doesn't have precise flat ground-keys
Set start and end frame for frame range to bake
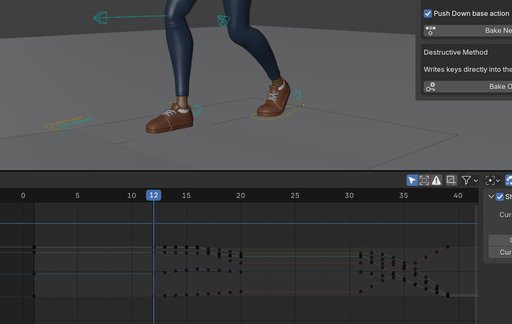
Trim the baked segments: If your walk cycle animation has keys close to the ground frames, the pinned animation might cause jumps from pinned range back to original animation. Stealing a frame or two might end up in smoother transitions.
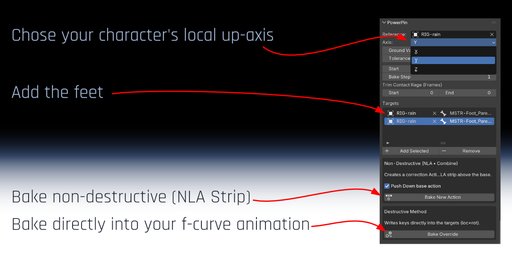
Chose between non-distructive mode (adding a NLA strip) or destructive mode (baking the pinning directly into your f-curves).
Typical Workflow
- Select your Reference (armature) and Targets (feet).
- Pick Axis, set Ground Value (0.0 for most rigs), adjust Tolerance if needed.
- Define Frame Range and Bake Step.
- If you see pops at contact boundaries, set Trim Contact Range (e.g., Start=1, End=1).
- Click Bake. Base action is pushed to NLA if needed; a Combine overlay is created and pinned per contact.
Instalation
- In Blender go to Edit > Preferences > Add-ons
- Click Install, then choose the wk_powerpin_1.0.0.zip file
- Enable wk_PowerPin in the list
- Access it from the Sidebar (N) > WK Tools
UI Parameters Reference (Documentation)
Menu Items
-
Reference
The object that defines the local space and up axis (typically the armature). Contact segments are measured in this space. -
Axis
Local up-axis used for contact detection (e.g., Z). -
Ground Value
Local value that counts as “on the ground”. Default 0.0. -
Tolerance
Allowed deviation from Ground Value for detection. Default 0.001.
Increase value if keys are not precisely on a flat curve. -
Targets
One or more bones/objects to pin (e.g., foot.L, foot.R). Each target is processed independently. -
Frame Range
Start/End frames to bake. -
Bake Step
Key spacing inside detected contact segments (detection itself still scans per frame). Default = 1. -
Trim Contact Range
Start: drop N frames at the beginning of each contact segment. End: drop N frames at the end of each contact segment. Note: trimming may slightly increase sliding within the trimmed tails/heads but reduces visible pops.
Shorten pinned segments to soften transitions if the source walk has keys right at the boundary or slides on entry/exit. -
Mode
Non-Destructive: Creates a new overlay action (Combine, Extrapolation Nothing). Base stays untouched in NLA.
Destructive: Writes keys directly to the target (use when you need final, baked data).
