batch_render_manager
A Blender addon for efficient batch rendering from multiple cameras with advanced project management features.
A Blender addon for efficient batch rendering from multiple cameras with advanced project management features.
Features Core Functionality- Multi-Camera Rendering: Render from multiple cameras in sequence
- Three Render Modes: Still images, animations, and background processing
- Smart Output Organization: Automatic directory structure with camera-specific folders
- Real-time Progress Tracking: Live status updates and progress bars
- Per-Camera Settings: Individual resolution and format overrides
- Render Presets: Save and load render configurations
- Auto-Camera Detection: Automatically adds new cameras to batch list
- Background Rendering: Non-blocking renders in separate Blender instances
- Safe File Handling: Automatic save prompts before rendering
- Download the addon file add_on_batch_rendart.zip
- Open Blender → Edit → Preferences → Add-ons
- Click "Install..." and select the downloaded file
- Enable "Batch Render Manager" in the addon list
- Add Cameras: Select cameras in 3D viewport and click "Add Camera" button
- Configure Output: Set project name and output path in Project Settings
- Choose Mode: Select Still, Animation, or Background rendering
- Start Rendering: Click the render button to begin batch processing
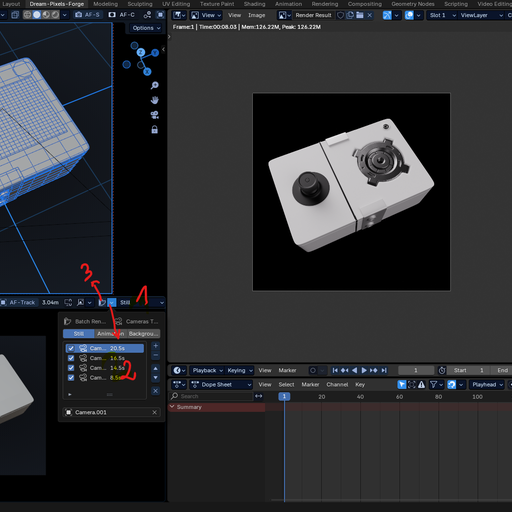
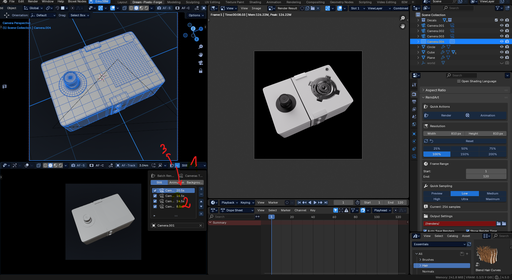
Quick rendering
1. Selection mode(see the screenshot)
2. Add cameras(see the screenshot)
3. Press render button (see the screenshot)
- Main Panel: Image Editor → Sidebar → Batch Render Manager
- Header Button: 3D Viewport → Header (quick access)
- Popover Menu: 3D Viewport → Header → Batch Render button
- Renders single frame from each enabled camera
- Output: [Project Path]/still/[Camera Name]/
- Best for: Product shots, architectural visualization
- Renders full animation sequence from each camera
- Supports custom frame ranges or scene settings
- Output: [Project Path]/animation/[Camera Name]/
- Best for: Walkthroughs, character animations
- Launches separate Blender instance for rendering
- Non-blocking - continue working while rendering
- Generates detailed log files
- Best for: Long renders, batch processing
Project Path/ ├── still/ │ ├── Camera.001/ │ └── Camera.002/ └── animation/ ├── Camera.001/ └── Camera.002/
Configuration Options- Project Name: Base name for all output files
- Master Output Path: Root directory for all renders
- Create Subdirectories: Organize by camera names
- Save Before Render: Automatic file saving
- Auto-Add Cameras: Detect new cameras automatically
- Select cameras in 3D viewport
- Click "Add Camera" button
- Cameras appear in batch list
- Enable/Disable: Toggle individual cameras
- Reorder: Move cameras up/down in render queue
- Remove: Delete cameras from batch list
- Clear All: Remove all cameras at once
- Resolution: Custom width/height per camera
- Format: Individual output formats (PNG, JPEG, TIFF, EXR, WebP)
- Notes: Documentation for each camera setup
- PNG: Lossless with alpha support
- JPEG: Compressed, smaller files (quality 1-100)
- TIFF: Professional quality
- OpenEXR: HDR with extended features
- WebP: Modern compression
- 8-bit: Standard (256 colors per channel)
- 16-bit: Higher precision
- 32-bit: HDR float precision
- Use Scene Frames: Respect timeline settings
- Custom Range: Override start/end/step frames
- Frame Step: Render every Nth frame
- Configure render settings
- Click "Save Preset" button
- Enter name and description
- Settings stored for reuse
- Select preset from list
- Click "Load" button
- Settings applied to current project
- Output format and quality
- Color depth settings
- Frame range configuration
- Compression settings
1. Set up multiple camera angles 2. Configure still image rendering 3. Set high-quality PNG output 4. Enable per-camera resolution overrides 5. Batch render all views
Animation Production1. Position cameras for different shots 2. Set animation render mode 3. Configure frame ranges per shot 4. Use background rendering for long sequences 5. Monitor progress via log files
Product Photography1. Create cameras around product 2. Override resolution for web/print versions 3. Set JPEG quality for web delivery 4. Use presets for consistent settings 5. Batch render all angles
File Naming Convention Still Images[ProjectName]_[CameraName]_[Timestamp].[ext]
Example: MyProject_Camera001_20241201_143022.png
Animations[ProjectName]_[CameraName]_[Timestamp]_[Frame].[ext]
Example: MyProject_Camera001_20241201_143022_0001.png
Troubleshooting Common IssuesRender Not Starting
- Check if cameras are enabled
- Verify output path is writable
- Ensure file is saved (if required)
Missing Output Files
- Check render settings match expectations
- Verify sufficient disk space
- Review error messages in console
Background Render Fails
- Ensure Blender executable is accessible
- Check file paths for special characters
- Review render_log.txt in output directory
"No enabled cameras found"
- Add cameras to batch list
- Enable at least one camera
- Verify cameras are valid objects
"File must be saved before background rendering"
- Save .blend file before background renders
- Use Ctrl+S or File → Save
"Failed to create output directory"
- Check path permissions
- Verify disk space available
- Use valid path characters only
- Use background rendering for long sequences
- Enable "Create Subdirectories" for organization
- Set appropriate timeout values for complex scenes
- Monitor system resources during batch renders
- Close unnecessary applications
- Use lower resolution for test renders
- Consider rendering in smaller batches
- Clear Blender cache between renders
- Minimum: Blender 4.5.0
- Recommended: Latest stable version
- Platform: Windows, macOS, Linux
- RAM: 8GB minimum, 16GB+ recommended
- Storage: Sufficient space for output files
- CPU: Multi-core recommended for faster rendering
- Check console for error messages
- Review log files in output directories
- Verify addon is properly installed and enabled
- Report bugs with detailed reproduction steps
- Suggest features with use case examples
- Submit improvements via pull requests
- v1.2.0: Blender 4.5 compatibility, production improvements
- v1.1.0: Added presets and background rendering
- v1.0.0: Initial release with core functionality
This addon is distributed under GNU-3.0 licensing terms.
Author: Dimona Patrick
Repository: Dream Pixels Forge
Support: Issue Tracker